Our article continues below with additional information and pictures for these steps. Finding out how to insert a hyperlink in Powerpoint 2010 is important when a slideshow that you have created utilizes pages on the Web. Whether it is an image, an online tool, a video, or even an entire website, the ability to simply click your mouse on a slide and access that information can add a lot of depth to the presentation that you are giving. While many people think of Powerpoint 2010 presentations as media that is meant to be viewed in a classroom or boardroom, many Powerpoint files are shared between individuals that are viewing them on their computers. If your target audience has access to a Web browser on the device or computer that they are using to view your presentation, you can take advantage of that functionality to incorporate a website into your slideshow. Learning how to hyperlink in Powerpoint 2010 will give you an extra tool in your Powerpoint arsenal that you can take advantage of to display the maximum amount of information to your audience.
How to Insert a Hyperlink in Powerpoint 2010
In case the terminology is not familiar, a hyperlink is an element that you can add to a piece of text or an image that makes that object clickable. The text that contains the hyperlink is called anchor text. When clicked, the hyperlink will redirect the clicker to the website defined in the link. For example, this text has a hyperlink and will take you to another article about embedding Youtube videos in Powerpoint 2010.
- Begin this procedure by opening the Powerpoint presentation that contains the object to which you want to add a hyperlink.
- Click the slide in the column at the left side of the window that contains the object you want to hyperlink.
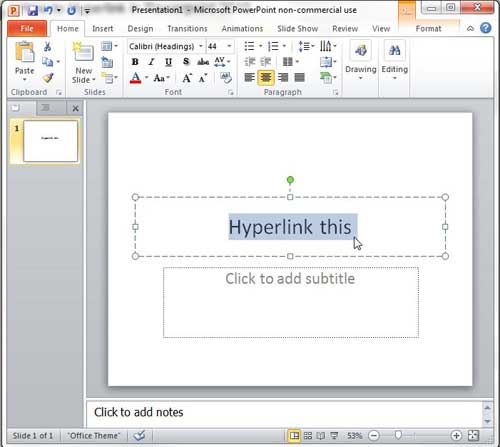
- Use your mouse to highlight the text you want to hyperlink, or click the image that you want to hyperlink. The image below shows a string of text that I want to hyperlink.
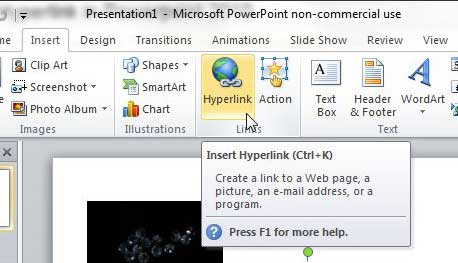
- Click the Insert tab at the top of the window, then click the Hyperlink button in the Links section of the ribbon at the top of the window. Note that you can also right-click the selected object, then click Hyperlink from the shortcut menu.
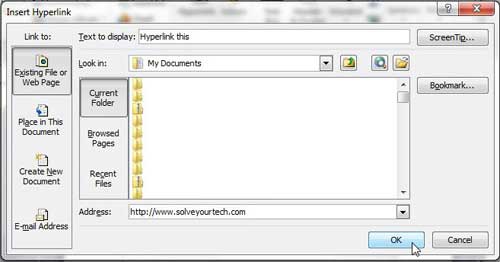
- Type the website address to which you want the viewer to be redirected into the Address field at the bottom of the window.
- Click the OK button at the bottom of the window to apply your hyperlink to the selected object. You can remove a hyperlink at any time by right-clicking the hyperlink, then clicking the Remove Hyperlink option. You will notice at the left side of the Hyperlink window in step 5 that there are a couple of other hyperlink options available to you, including Place in this Document, Create New Document and E-mail Address. You can experiment with these to use hyperlinks to other locations besides websites. The color of the Powerpoint hyperlink is determined by the settings for the current presentation. Additionally, the hyperlink color may change depending on whether or not it’s already been clicked. You can control the colors of Powerpoint hyperlinks by adjusting settings found on the Design tab for the presentation.
Create Hyperlink in Powerpoint 2010 – Quick Summary
Now that you have created your hyperlink in Powerpoint, you have the ability to change some of the things about that link. For example, find out how to change the color of the hyperlink if the current color doesn’t match the style of your presentation. Would your slideshow look better if it was in portrait mode instead of landscape? Learn how to change the slide orientation in Powerpoint 2010 away from the default landscape option. After receiving his Bachelor’s and Master’s degrees in Computer Science he spent several years working in IT management for small businesses. However, he now works full time writing content online and creating websites. His main writing topics include iPhones, Microsoft Office, Google Apps, Android, and Photoshop, but he has also written about many other tech topics as well. Read his full bio here.
You may opt out at any time. Read our Privacy Policy


