Whether you have a picture and want to include some text on top of it, or you need to position text in a way that is difficult with traditional means, then our insert text box Google Docs tutorial below can help you to add that object to your document.
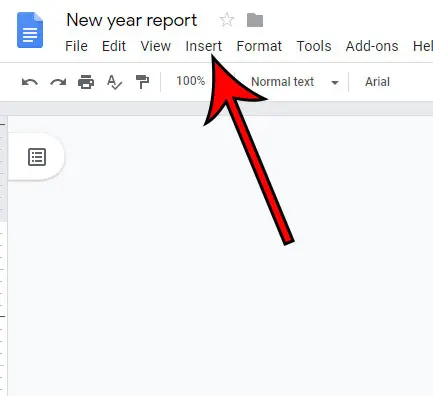
How to Add Text Box in Google Docs
Our article continues below with additional information on inserting a text box in Google Docs, including pictures of these steps. When you have cells overlapping the text in other cells, then you can read our Google Sheets text not wrapping guide and find out how to fix that problem. Google Docs provides you with a lot of tools and formatting options that allow you to create the type of document that you need. However, you may be wondering how to insert a text box in Google Docs because there isn’t an obvious way to do so in the application. While much of the content that you add to a document in Google Docs will be done by simply clicking in the document and typing, you may have other needs. Certain document layouts can only be accomplished by positioning content in a way that is not achievable via standard document editing. Luckily you can use text boxes in Google Docs to accomplish this. But adding a text box in Google Docs isn’t as simple as it is in other word processing programs like Microsoft Word, and you need to use an additional tool to insert a text box in a Google Docs document. Our guide below will show you where to go to complete the insert text box Google Docs process, as well as how you can edit text box information after it’s been added. If you’ve been trying to find a simple way to move content to the next page, then our page break in Google Docs article can show you how.
How to Add a Textbox in Google Docs Document (Guide with Pictures)
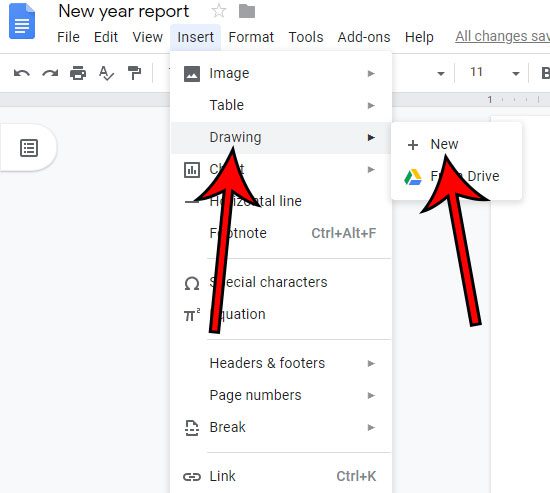
The steps in this article were performed in the Google Chrome desktop Web browser, but it will also work in other desktop browsers like Firefox or Edge. Other Google Apps can have text boxes, too. This guide will show you how to remove a text box in Google Slides. You can edit the text box later by either double-clicking on it in the document, or clicking on it once, then selecting the Edit option. This is going to open the Drawing dialog box which will allow you to draw your text box shape and utilize the rest of the drawing tool’s commands. When you double click Edit, it will bring you back to the drawing area, where you will be able to add custom shapes, or format your text box in other ways. Alternatively, you could elect to add a shape with the drawing tool, then double-click inside that shape and start typing. You can also use Google’s dedicated Drawing tool, then add the text box created there to your document.
How to Add a Google Drawing Text Box to Google Docs
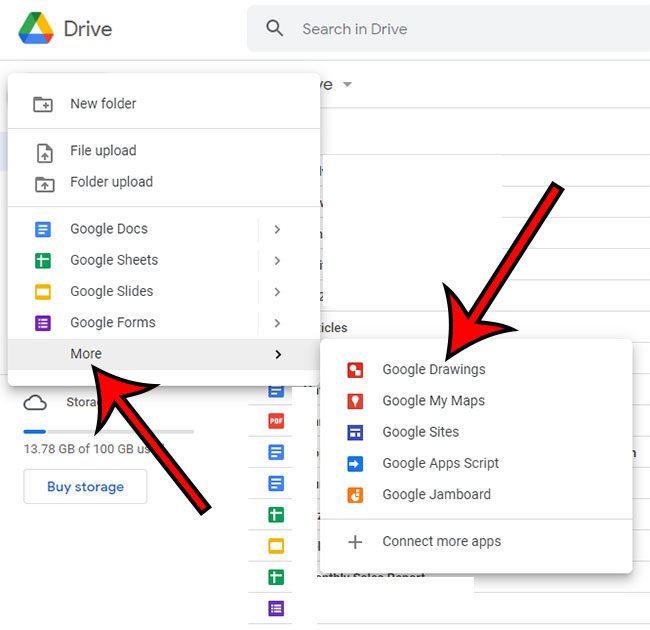
One option that you may not be familiar with in Google Drive is the “Google Drawings” app. You can create a new drawing in Google Drive by clicking the “New” button, selecting “More”, then “Google Drawings.” This is going to open the same drawing canvas that we accessed through Google Docs before. One benefit of this option is that you can then easily re-use that drawing again in the future for other documents. Google Drawings files can be added in the same manner as a picture to Google Docs. Simply go to Insert > Drawing > From Drive.
How to Use a Single Cell Table as a Text Box in Google Docs
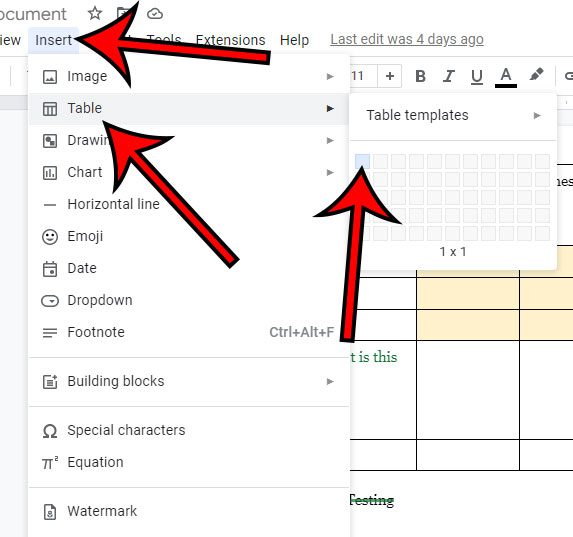
One other option that you might consider for adding a text box in Google Docs is to create a table with one cell. You can do this by going to Insert > Table and clicking the top-left box. This can create something that looks like a text box, which can be ideal if that is the effect that you want. Essentially, you are creating a table that only has one column and one row. If you position your mouse cursor on any of the table borders, the cursor icon will change, and you can drag it to the desired size. Another benefit of the single cell table text box is that you can actually edit and format the text directly from Google Docs. The drawing method will always require you to double-click the drawing and open it on the canvas, which is a little less efficient.
Can you enter a text box in Google Docs?
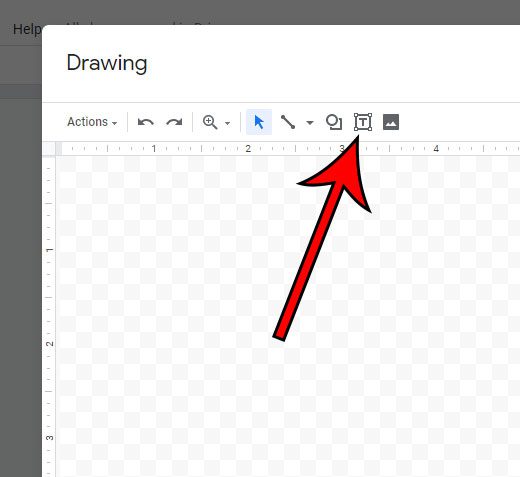
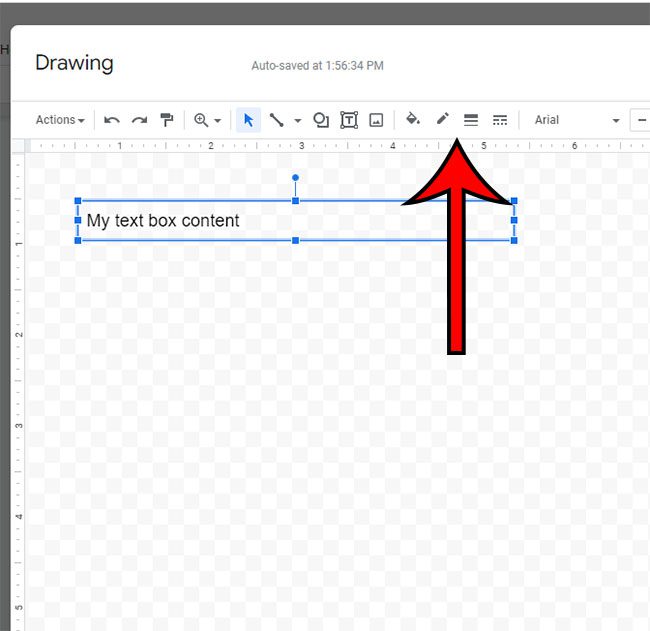
When learning how to insert a textbox on Google Docs, you will likely explore most of the options in the menu bar at the top of the window. But unlike figuring out how to add a text box in other word processing applications like Microsoft Word, the Google Doc insert text box method uses a drawing tool instead. While this drawing method is an interesting alternative to add a text box to a document, the drawback is that you need to go back into this tool when you want to edit the information inside of it. So you simply double-click on the box in the document to open the drawing tool, then you can click inside the box to add or edit the text. Note that if you wanted to change the color of the box you would also do it on this menu. Click the Fill color button at the top of the window, then choose the color for the background. You also have other options such as adding an image to the text box as well.
How do you put a text box on a picture in Google Docs?
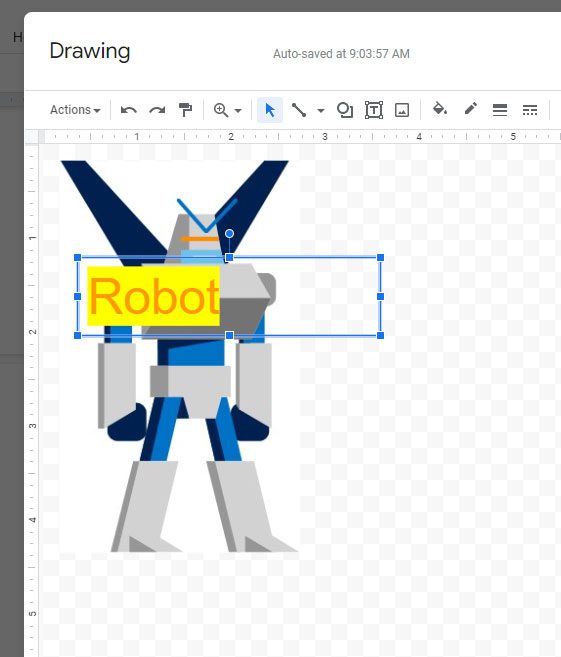
Now that you know how to insert text box on Google Docs you may eventually encounter situations where you want a Google Docs text box in some atypical situations. One such situation involves adding a picture to the document, then writing text over top of it. But you will discover that you can’t simply use the drawing method to create a text box, then click and drag the text over top of your image. Alternatively, you aren’t able to add a new object directly on top of an existing image. Fortunately, the Drawing tool is a little more than just a way to add text boxes, and you are able to insert images, too. So if you are trying to place a text box over an image in Docs, go to Insert > Drawing then click on the Image icon in the toolbar and add the picture. Then you can click the Text box icon and draw your object, then add the text. Finally, drag the text box over the top of the picture to achieve the desired result. Note that you may need to experiment with different text colors or fill colors as well, otherwise the text may be difficult or impossible to read.
How do I include a text box?
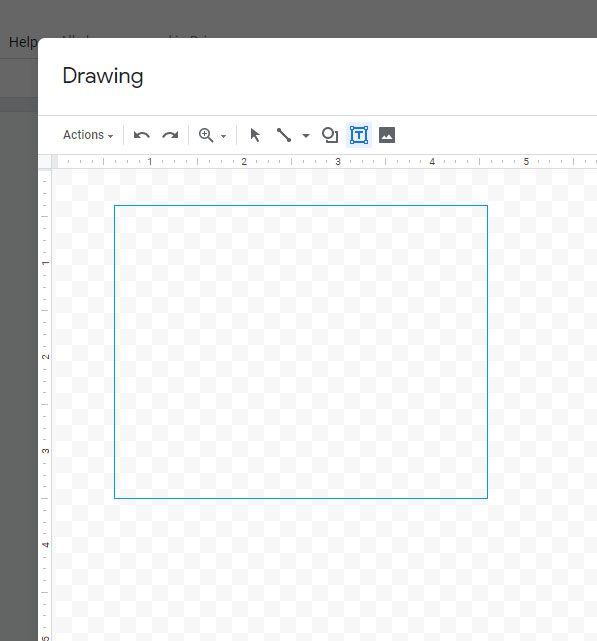
As mentioned in the article above, you can add one by choosing the location where you want it to appear in the document, then clicking the Insert tab, followed by the Drawing option. The Text box icon is then available in the toolbar above the window. You can then use your desired formatting command to rotate or position the text box. After you have drawn the object and added the words to it, you can click the Save and Close button to insert it into the document. Any additional edits can be accomplished by double-clicking on it inside the document, where you will be taken back to the Drawing tool. There are some additional features available in this application that allow you to control the appearance of your content. For example, inserting a table can be a useful option when you need to show a lot of data that doesn’t really fit well into paragraph format. This is done by going to Insert > Table and choosing the number of rows and columns. Additionally, if you need to adjust the appearance of content that you have already added to the document, you can do so by clicking and dragging with your mouse to select the text, then choosing the various options in the toolbar above the document. For example, you could change the font or the font size for that selected text. Find out how to change margins in Google Docs if the existing margin settings are different from what your document requires.
More Information on How to Insert a Google Docs Text Box
Unlike other word processing applications such as Microsoft Word, Google Docs requires you to use the Drawing tool in the application rather than simply adding a text box from the Insert menu. If you are new to working in Google Docs, then this can be a little confusing. However, once you are accustomed to how the drawing tool interacts with other objects in your Google Doc, then it makes a bit more sense. This is of particular importance when you need to layer objects, such as when you need to know how to insert a text box over a picture in Google Docs. To accomplish this, you need to add the picture to a drawing canvas first, then add the text box on top of the picture in the drawing tool. This is a nice way to accomplish the desired result as you have a lot of freedom to move objects around in the Drawing tool, which may not be as easy to accomplish in Microsoft Word. While you are adding a fillable text box to your document, the desired formatting command options for that text box, as well as the option to manipulate text boxes, are only accessible when double-clicking the text box in the document. Google Docs lets you format the text box in several ways. You can adjust the text box border, weight, line styles, and color using the icons in the toolbar above the canvas. You will also note some other options like a fill icon that lets you add a background color to the text box, as well as a Shapes icon that lets you add other shapes to the drawing.
How to Insert a Text Box or Custom Shape in Google Docs
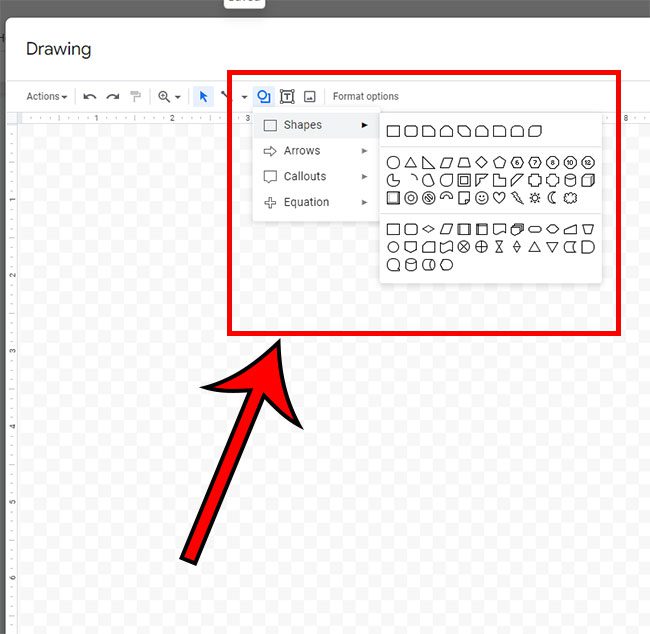
While we have focused on adding text boxes to Google docs documents in the tutorial above,m you can use a similar method if you wish to add a custom shape to your Google Doc. Simply go to the Insert menu and select the Drawing option from the drop down menu, like you were doing to add text boxes with the steps above. You can then click the Shape tool in the toolbar, then select one of the options from the drop down menu there. There are more shapes on this menu than you might expect, with options like arrow, callout, and equation symbols in addition to a traditional shape option like a rectangle, triangle, or oval. Once you have chosen a shape, you can click and drag on the drawing canvas to insert it. If you want to draw your own shape, then you can use the Line tool in the toolbar and then select the Scribble option. This allows you to insert a freehand shape into the drawing, which you can then add to the document. So while adding text boxes via the Drawing tool is a beneficial way to customize your document, that tool has a lot more options to it that can let you add the content to your Google Doc that your project requires.
How to Format a Text Box in Google Docs
Once you have created some text boxes for your Google doc files, you may find that you need to change something about them. If you click on the text box you can use some of the options in the toolbar to adjust the appearance of the text box. This includes options like:
Fill color – when you click the Fill color paint bucket icon you can choose a color from the dropdown menu , which will fill in the empty space in the text box. Border color – If a border for one of your text boxes in visible, then it probably has a black border. You can change this to basically any other color, however. Border weight – this is probably one of the drawing tool’s commands that is used less often, but changing your border width can have a dramatic effect on the way it looks. Border dash – the borders of your text boxes are going to be solid lines by default, but there are some other line styles available that you might enjoy.
You can also select the text inside of the text box, then change things like the Font, Font size, and Font color.
How to Arrange Text, Shapes, Diagrams, and Lines in Google Docs
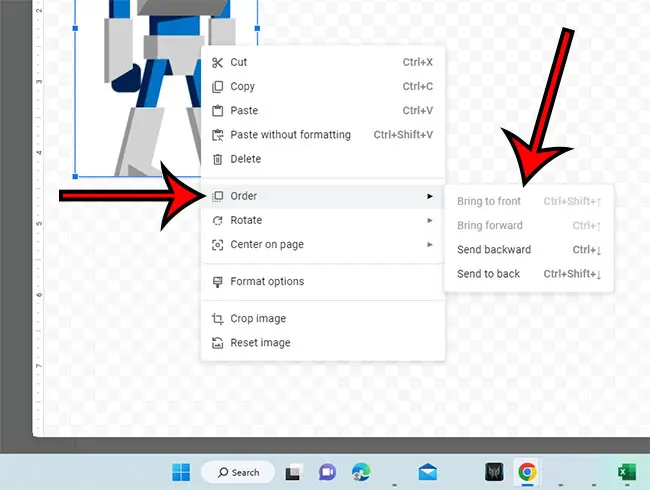
One final thing to familiarize yourself with regarding Google Doc text boxes is the fact that you can layer objects in a drawing. We have previously discussed doing this with text and an image, but you can also use it to draw on top of picture with the scribble tool, or put text on top of a shape. Once you have at least two objects in your drawing dialog box, you can click and drag on them until they are on top of one another. You can then right-click on one of the objects, choose the Order option, then choose from the following contextual menu options:
Bring to front Bring forward Send backward Send to back
Note that an ordering option might be grayed out depending on the current location of an object. For example, if an image is already on the top layer, then you won’t be able to use the Bring to front or Bring forward command because there’s nothing to be done. You can also click on the text box once to select it, then press the Delete or Backspace key to delete it. – Line– Shape– Text box– Image Simply click on the object in the document, where you will see a menu appear below the object. The options on this menu include: – Edit– In line– Wrap text– Break text– Behind text– In front of text Text boxes in Google Docs are a bit more versatile in what you are able to accomplish as far as layout and positioning are concerned. Once you have inserted the text box in the document, you are able to type content into that box. What makes this different from the standard locations for text, like the document body or a spreadsheet cell, is that you can move the text box to different locations in the document that you wouldn’t be able to achieve with traditional layouts. You can also format the text box content in ways that you can’t apply to regular text. Once you get to the drawing dialog box, you can place text boxes on top of pictures or shapes, you can put a background color behind text, use unusual font sizes, orientations, and alignments, and generally achieve the look or layout that you might want for some custom content in your document. After receiving his Bachelor’s and Master’s degrees in Computer Science he spent several years working in IT management for small businesses. However, he now works full time writing content online and creating websites. His main writing topics include iPhones, Microsoft Office, Google Apps, Android, and Photoshop, but he has also written about many other tech topics as well. Read his full bio here.
You may opt out at any time. Read our Privacy Policy